
Zero To Hero in Foundry - Part 1: Getting Started
Let's Begin
Get ready to sweat it out in style while you Forge some piping hot Smart Contracts with molten, smoldering Solidity inside blockchain Foundry
This article is the first of many in which we'll dive deep into building, testing and deploying Smart Contracts using Foundry. We'll also see how to use Foundry to interact with the deployed Smart Contracts.
One article per day and by the end of the series you would be able to use Foundry like a PRO
LFG! 🚀
Today's Outcome
What's Foundry?
Install Foundry on our systems
Build and Test a basic Counter contract
Foundry, What!? 😯
Imagine a beautiful Saturday night - you have a wondrous steak simmering on your pan, ready and staring back at you. What do you do next? Do you just leave it there like that? Do you just walk away? That would be ludicrous!
Steaks, Me like - Spice Boo
You'll get the steak out and slice it, taste test it(I know you're drooling!), transfer the slices to a plate and use cutlery to consume that beauty!
Congratulations! You've become the Foundry of Steaks!

Enter Foundry
OOOKAYY!! - this is exactly what Foundry does for your Smart Contracts
You have your Smart Contract simmering in your IDE
Foundry lets you taste "Test" it
Helps you "Deploy" it to your blockchain plate, and
Finally let's you "Interact" with the plated Smart Contract
BOOM! Everything you need in ONE SINGLE PACKAGE! And everything written in pure Solidity, no JS/TS!
Enough about steaks, let's start forging
Foundry, How? 🔨
Let's look at how we can setup Foundry in our systems. But, before we do that let's make sure our systems are prepped for installing Foundry

📦 Prerequisite
Rust compiler and Cargo - The easiest way to install them is to go to rustup.rs and follow the steps.
On Windows:
Make sure you have a recent version of Visual Studio with the "Desktop Development with C++" workload installed.
🛠️ Install Foundry
Foundryup is the official installer for the Foundry toolchain. 📘 Learn more here
- Install Foundryup
curl -L https://foundry.paradigm.xyz | bash
This will install the foundryup command in your CLI
- Follow this up with running the command
foundryup
This will automatically install the latest stable versions of forge, cast, anvil and chisel. Each of these have it's own role to play. We'll get to each of them as we progress in the series
👨🍳 Start Cooking

For today's lesson, we'll be looking into how forge helps us build and test Smart Contracts
Let's create a folder named foundry-learn and move into that. Add a simple Counter contract using a forge command
forge init Counter
This will create a new Counter folder within your project folder. Once you move inside this folder you'll see a whole bunch of stuff, but let's just focus on 3 folder for now
lib- Holdsforge-stdlibrary, which helps us write Tests and Deploy scripts using pure Soliditysrc- Holds all your.solSmart Contract filestest- Holds all your.t.soltest files
We have our sample contract and test file in their respective folders. Let's look at how easy it's to test and build our contract
- Here's our
Counter.solcode insrcfolder
// SPDX-License-Identifier: UNLICENSED
pragma solidity ^0.8.13;

// This is a simple counter contract that allows you to set a number,
// increment it, and decrement it, with a check to prevent negative values.
contract Counter {
    uint256 public number; // The current value of the counter

    // Sets the initial value of the counter
    function setNumber(uint256 newNumber) public {
        number = newNumber;
    }

    // Increments the counter by 1
    function increment() public {
        number++;
    }
}
The simple contract lets us write a number to a state variable and increment it by 1 by calling a public function
- And here's the
Counter.t.soltest file in thetestfolder
// SPDX-License-Identifier: UNLICENSED
pragma solidity ^0.8.13;

import {Test, console} from "forge-std/Test.sol";
import {Counter} from "../src/Counter.sol";

// This is a test contract for the Counter contract.
// It includes tests for incrementing, decrementing, and setting the counter value.
contract CounterTest is Test {
    Counter public counter; // Instance of the Counter contract

    // Sets up the test environment before each test
    function setUp() public {
        counter = new Counter();
        counter.setNumber(0);
    }

    // Tests if the counter increments correctly
    function test_Increment() public {
        counter.increment();
        assertEq(counter.number(), 1);
    }

    // Fuzz test for setting the counter value
    function testFuzz_SetNumber(uint256 x) public {
        counter.setNumber(x);
        assertEq(counter.number(), x);
    }
}
This tests if the state variable is being set properly and incrementing is working on function call
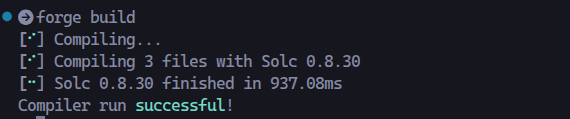
🏗️ Build
It's time to compile/build our Contract. To do that, let's run this command while in the Counter folder
forge build
Your Contract will now be compiled using the latest Solidity compiler
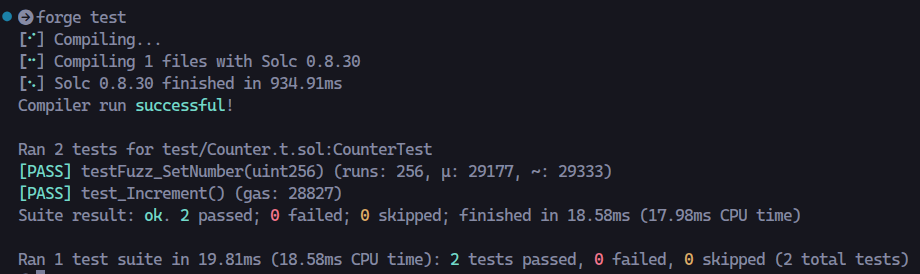
🧪 Test
To Test the Contract all you have to do is run this command while in the Counter folder
forge test
If everything is setup properly, you'll see that the tests passing successfully
And that's a Wrap! (For now 😬)
By now you should have
Foundry and all it's tools installed in your system.
Created Counter project using
forgeUnderstood important folder structure of generated project
Built and Tested the simple Counter contract using
forge
What's Next?
Part 2, we'll dig into
Deploying your tested Contracts
Interacting with deployed Contract using terminal commands
Don't miss it! I'll see you soon! 😎